The digital marketing trends are in constant shift as new strategies and technologies become the latest standard. Ecommerce business owners are among the many segments affected by these changing patterns. To survive and sustain, it is important to accurately monitor and analyse every marketing activity, making informed decisions faster.
Web analytics makes performance tracking simple & hassle-free with UTM tagging. Using definitive UTM codes is one of the best ways to analyse performance of any digital marketing campaign. It allows data tracking, enabling competitive analysis of incoming traffic and conversions generated from each campaign source.
UTM tagging is especially handy for small-to-medium Ecommerce business owners where resources are limited. Without knowing which digital marketing campaigns are working for your business, you will be wasting both money and time.
So, how do you tag your marketing campaigns? What is UTM all about? Here is an in-depth guide to effectively use UTM tagging for your Ecommerce business.
Why is Performance Tracking Important?
At the heart of a successful Ecommerce marketing tactic lays the ability to track your campaigns accurately. It has a number of benefits for online retailers:
♦Assess Channel Performance to Optimise Resources: When done properly, web analytics enables consistently tracking channel quality and optimising resources likewise. For instance, analytics helps you determine which channel would perfectly blend with the campaign. Suppose for product launches, it may turn out that emails work best to generate high-value purchase from the existing customers. On the other hand, social media marketing may work best to attract new customers for time-limited offers.
♦Effective Attribution: Suppose you have three types of marketing campaigns running this month for your Ecommerce store – monthly newsletters, special promotion via social media and paid ads, and welcome letter for new subscribers. Now, if you want to track performance of your email marketing activity, you have to tag all these campaigns appropriately. You have to also tag every channel used in a campaign individually. This not only helps in monitoring the traffic generated from a campaign, but also shows which channel is effective in driving conversions.
♦Drive Higher Conversions: Having critical data & reporting at your fingertips aids in informed decision-making, helping you constantly tweak your marketing campaigns and the overall layout of your online store. This is crucial to build a profitable business.
Understanding UTM Tagging & Its Benefits
Urchin Traffic Monitor, or UTM, is a link tagging process in which definite campaign parameters are added to the links that the users click to visit your online store. This is done in the form of tagging, adding small snippets of text at the end of every URL that is meant to direct traffic to your site. These tracking parameters help you analyse from which source your traffic is coming from. This helps in better attributing the high-performing channel to the right campaign.
The key benefits of UTM tagging are discussed here with:
• Know from where your web traffic is coming from, or which channels are more effective in driving users to your site
• Utilise the right channel for the right digital marketing campaign. For example, you want to track performance of your special promotion campaign – up to 30% discount on summer collection. To promote the campaign, you have implemented social media strategies, paid ads and one-time bulk emails. When tracking performance through UTM codes, it turns out that social media responses are the highest for your special promotion. The data will help you improve more on social media ads to generate the most traffic.
• Understand and analyse user behaviour
• Track which content gets highest response
How to Perform UTM Tagging for Ecommerce Marketing Campaigns
To tag one or several digital marketing campaigns, you have to build a link having specific UTM parameters that help analyse all activities related to the campaign. You can take the help of Google Analytics URL builder to have a unique link which comprises of the URL followed by a “?” and the campaign UTM tags. The link should be one that the customers click to get your online store.
When a user visits your Ecommerce site via a UTM-tagged URL, the parameters will help direct to the specific landing pages. These will be saved in a cookie and all the activities during this session will be attributed to the UTM tags.
There are 5 kinds of UTM Parameters that you can add to the URLs. Each parameter should be paired with an assigned value which makes it easy to identify a campaign.
♦Campaign Name (utm_campaign)
This is used to identify a specific campaign or product promotion. It should be unique and easy to identify. For example, UTM campaign name for 30% discount offer can be utm_campaign=promo30.
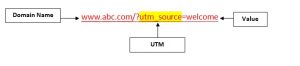
♦Campaign Source (utm_source)
It is used to identify the campaign-type grouping or referrer. For example, utm_source=welcome can be used to identify welcome emails to new users.
♦Campaign Content (utm_content)
It can be used to A/B test different links or ads pointing to the same URL. For instance, utm_content=textlink. For content that has two or more call-to-actions, you can assign different values for each to let you know which one is more effective.
♦Campaign Medium (utm_medium)
This UTM parameter is used to track the type of marketing campaign. For example, you can use utm_medium=social to identify social media ads.
♦Campaign Term (utm_term)
This is used for PPC ad campaigns to identify the keywords for an advertisement. For example, utm_term=monsoon+shoes.
To create a link using these parameters, see the example below:
Step-by-Step Guide to UTM Configuration
Now that you have understood what is UTM tagging and how it can help in performance tracking, here’s how to go about it:
Step 1: Copy UTM Files to Ecommerce Site Document Root
To track marketing campaign data for your Ecommerce store, you have to follow as mentioned below:
♦ Go to the UTM directory of your Urchin distribution
♦ Copy the files _utm.gif and _utm.js to your site document root. Either upload, drag and drop or copy the files to your website’s main directory
♦ Do not change the file names.
♦ Next, include the _utm.js file at the beginning of each webpage URL. If you use a static HTML site, you have to modify and add the UTM text to each URL individually. If the site uses includes and have a header include for each file, you can place the UTM in the starting if this include file, and it will become a part of each URL automatically. For dynamic Ecommerce websites having content generation engine, the UTM can be added at the beginning of specific templates that are delivered to the users.
The following code should go in the starting of each HTML page and after any Meta tags that are delivered to the customers.
Step 2: Set up UTM Domain
Urchin Tracking Monitor has specific domain setting that helps control the scope of the cookies. If you have a single Ecommerce website running, leave alone the default setting “auto.” If you run multiple websites (each targeted for individual locations) that have a common root domain and you want to process them altogether, then set the UTM domain to the common root domain.
Edit the _utm.js file that you copied into your website document root in the previous step. At the top, you will see:
var _udn=”auto”; /*– …
Change “auto” to the domain where the cookies should apply to. It must be a part of the entire URL of your Ecommerce site. For example:
var _udn=”xyz.com”; /*– …
Step 3: Allow Cookies in the Logging
Next, you have to verify and likewise, change the logging format of your server. To ensure that UTM works properly, both the cookie and referral information must be logged. For this, you need access to the web server’s configuration. Check with the system administrator to activate cookies in the logging.
Step 4: Enable UTM Tracking in Urchin Configuration
For proper UTM installation, you have to set the UTM tracking in Urchin configuration. This can be done while creating the Profile or editing the Profile afterwards.
♦ Open the Urchin Configuration. You can also log remotely via “admin” user
♦ Click on the icon “Configuration” to have an entire list of the existing profiles
♦ If you have not added any profile yet, do it by clicking on the “Add” button
♦ To activate UTM tracking for a specific Profile, click the “Edit” option to the right of the profile name
♦ Next, click the “Reporting “ button to open the Reporting Settings window
♦Under “Visitor Tracking Options” drop-down menu, select “Urchin Traffic Monitor (UTM)” for Visitor Tracking Method.
♦ If you have already set the UTM domain as in Step 2, then add the setting to Visitor Tracking Method in the same way as in Step 2. If you have not done UTM domain setting, then set it to the address of your Ecommerce website without typing the “www.” If the site does not begin with “www,” then use the entire domain name.
♦ Click “Update” to save the settings
The UTM installation process is complete. Now you can track your website visitors and different marketing campaigns in the most effective manner.
Conclusion
Having a strong setup for data collection, reporting and analytics will provide you with valuable information that is vital in making critical business decisions. UTM tagging, if mastered, can give your Ecommerce business a significant competitive advantage.

Never miss a story..!!
Grab the Latest SEO & SMO News, Tips, Updates & Trends..!!
See Our Blogcenter